Tuesday, September 25, 2012

Seasonal Decorating: Table Runners for Fall

The first day of fall is a good time to change out all the summer details and make room for fall. Around these parts, however, it is still just a little too hot for me to be putting out things like wool fabric and quilts.

But fall is almost here and I am so ready!  The temperature has finally dipped below 90 and the mornings are actually quite cool, so I'm going for it!

Table runners are really easy to make. Here are some ideas for fall:
wool with a linen ruffle and brown floral ribbon

burlap with grey floral ruffle and pumpkin piping

burlap with linen ruffle, black and white polka dot ribbon and pumpkin piping

wool with linen ruffle and blue and brown fleur de lis ribbon

Start by measuring the length of your table. If you want the runner to overhang, add 10-12 inches.
For example, my table is 72" long, so I cut my fabric 84". That makes a 6" overhang on each side.
 The width can be anywhere between 12" and 18". Hem the runner on both long sides.

For the ruffles, decide how long you want it to be and cut the width twice as long as the runner's width. Hem the ruffle on 3 sides; on the 4th side, using the longest stitch on your sewing machine, 
 sew a straight line across, leaving long strands of thread on each side and don't backstitch. Then start to pull one thread on each side, a little at a time, until the ruffle is the same width as the runner.
Stitch the ruffle to the runner, right sides together.

To add decorative ribbon, just stitch it over the top, remembering to turn under the ends.

 If you want piping, you have to think ahead and place it between the ruffle and runner when you stitch them together.

Friday, September 21, 2012

Wedding/Baby Shower Gifts

I like to take handmade gifts to wedding or baby showers whenever possible.

Sometimes it's easy to make something personal.

For a cute wedding gift, try this:

Spell out the word, "Love" using pretty paper as background and add the wedding date.


 Or use luggage tags with scrapbook paper to match the wedding colors as background. Add the wedding date in the corner to make it even more personal.

As for baby gifts, most people find out their baby's gender early, making it easy to make a personal gift.
Scrapbook paper to match the nursery, baby's name written on luggage tags, 
add date of birth, maybe even height and weight.

But sometimes it takes a little more creativity.

For example, I attended a baby shower recently for someone having her third child. They don't like to know gender ahead of time, so I didn't have much to go on.

This is what I came up with:

Pretty scrapbook paper as the background again.

An appropriate saying, such as,
"we are known to You by name and loved for all eternity"

 
Then I added 3 luggage tags to write each child's name and birthdate on.

I included a few more tags for any future children.


Friday, September 14, 2012

A Happy Coincidence and a Dining Table

 Serendipity: A happy coincidence; making desirable discoveries by accident; good fortune, luck.

That's what sometimes happens when you are yard saling and thrifting for furniture to remake and sell to others. You stumble across something that is perfect for you.

For several years I have had this dining table:

I never really liked it, but, like so many other things, the price was right, the size was right, and it would serve the purpose until something better came along or we won the lottery.

Well, 15 years later, I made a burlap "slipcover" for it and I was pretty happy with that. 

But after nearly a year, I was getting tired of the burlap table. I had planned to paint the table over the summer, but life got in the way and I never had the time.

A few weeks ago Husband and I went to some yard sales and found this:
I was in business mode and didn't even think of keeping it for myself.

But when we got it home, I took a really good look at it.
Real wood.
Good bones.
With a leaf, longer than the one I already had.

Needs work, but that's kinda what I do...


Tuesday, September 11, 2012

Get Creative with Chalkboards: Versatile, Functional and Beautiful

Chalkboard paint is one of the greatest inventions of this era. Ok, I am exaggerating a bit, but I really, really love chalkboards! And so does everyone else.

They can be made out of anything and are super easy and cheap!
Yard Sale Frames


 If there are pictures in the frame, you can paint chalkboard paint right over the top.
If there is a mirror, like was the case in the blue carved frame, you can either paint over the mirror, or turn the mirror over and paint the back. This gives you the option of mirror or chalkboard!

Doors and Windows
They are the perfect shape and often have a natural space for a chalkboard, either a pane or panel.
And the knob is a perfect place to tie a piece of chalk .Great for messages, lists, anything you desire.

Tables
.
 Turn any table into a message spot, a place to keep kids happy while you are busy, or a serving table where you can write the name of the dish right on the table!

You probably have something hanging around the house just waiting for chalkboard paint!


Saturday, September 8, 2012

Furniture Project: Various Small Tables


Small end tables are always a good buy at yard sales and thrift stores. No matter the finish, once you paint them, they take on a whole new look. All of these tables below were boring brown wood or veneer and totally unappealing. But they had something worth saving about them.

Love the French legs and carving on this one.

A color surprise inside the drawer!

A really nice size and turned legs, plus the double shelves.

A little grey color and French saying (That's life!)

The only thing this one had going for it was the price (free).

But with a little paint and creativity, even ugly can be overcome!

Thursday, September 6, 2012

On The Lookout For Just The Right Kitchen Island

Ever since we ripped out the kitchen peninsula, I have been on the lookout for just the right piece of furniture to use as a kitchen island. My criteria was counter height (35-36"), narrow enough to get around the kitchen easily (about 16-18") and not too long so it wouldn't jut out into the dining room (about 36"). 

I was also hoping for wheels to make it more flexible and some type of storage, a drawer, open shelves, anything like that.
I began by trying out tables I already had and living with them for a while.

I started with this antique oak draw leaf table.


I loved the look of it, and I could get 2 stools underneath which made it convenient, but it lacked any storage and was just a little too wide and short to be really comfortable. The other problem with this table was that I was always worried about ruining the finish, and that just would not do in the kitchen.

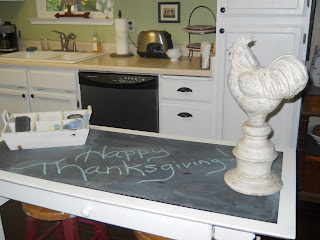
Next, I tried a table I had painted with chalkboard paint for the grandkids.

.
It was a little better in that it had a drawer and was  slightly narrower. It still needed to be taller, so I considered adding a shelf to the bottom and then putting wheels on it. This would not only make it taller, it would also add storage and the flexibility I was looking for. But I thought I could do better, and it was still a tiny bit too wide and a hair too long.

So I moved it outside and traded places with a little red table that was sitting on the back porch.


The size was perfect and I LOVED the red color. There was no storage, but I could add a shelf on the bottom and wheels, so I though this might be the one. The problem, however, was that this little table had sat outside for so long, I couldn't get it really clean, thus the large cutting board on top. I was going to have to paint it to be comfortable with the cleanliness, but so far it was my best option.

Then, on one of our painting weekends in Ashland, I found this:


It had been left behind by a tenant, so I brought it home to give it some love and maybe put it in my booth at the Antique Mall.

But first, I tried it out for size in my kitchen.

size:  "16 x 35 "...check
counter height: 36"...check
storage...check and check
wheels...check again

It was meant to be.

Now to make it beautiful!


Monday, September 3, 2012

Life is All About Plan B

Today I turned the page on my calendar and this is what it said:
"Life is All About Plan B"

I thought about how appropriate that was for this day. You see, today I am having to come to terms with Plan B.
Two years ago, when my son and his family bought a little house just about a mile from my own, I thought, "This works really well with my plan to be Super-Grammy!"


And that is how it has been for the last 2 years. Thursdays were "Grammy Day". The kids would come for the entire day and we would play, bake cookies, watch movies, plant gardens, paint birdhouses... all part of my Plan A.

 
 And any other time they needed a babysitter, I was there. I would never say no, no matter how tired or busy I was, because I knew there would come a time when they would begin to outgrow Grammy and want to spend more time with their friends.


Little did I know how soon it would all change!

Today, I helped them pack up their little house so they could move to Sacramento, about 2 hours away. My son has been commuting to grad school and the school has offered him a full time job with tuition credits, so it was really a no-brainer. 


So, now I have to switch to Plan B. I'm not yet sure what that will look like; this whole thing happened so fast that I haven't had much time to work it out.


But it will probably involve staying busy with my new business and getting back to some old favorite activities. I have promised some new quilts, one, pink with lots of flowers and birds, one, blue with big stars and maybe planets. Not to mention the many unfinished projects around the house.


And, of course, I plan to make lots trips to Sacramento!


To be honest, this isn't the first time I have had to go to Plan B and it probably won't be the last. That's life; you never know what's going to happen, you just have to trust the Author of Life that His Plan A is the right one, and keep adjusting your plans until you get there!