In all my previous houses, I wanted to do something interesting to the ceilings,
the 5th wall as some decorators call it.
Wood, beams, stencil, wallpaper...

So, in this House with Potential, I am incorporating many of the things I always wanted to do, but didn't, either because of money, time, or appeal to the masses for resale.
To start with, the ceilings in this house were popcorn. Those of you in California know what I'm talking about. So, before we even moved in, my son and I scraped all that mess off the ceilings. But that's where it stopped.
They are still mostly bare drywall.

Last week my daughter came over to help me with some projects and we decided to get started on the family room ceiling.
Originally, I had planned to use beadboard panels, 4'x8', cut in half to make them easier to work with, and beams to hide the seams. But I would need Husband for this project and he is working quite a bit, so I wasn't sure when it would happen. Every so often, I would suggest starting this project, but...well...you know how it goes.
 So last year, when I discovered beadboard wallpaper at Lowes and used it on my interior doors, I started rethinking my ceilings.
Not only would it be easier and cheaper, I could actually do this myself, on my own timeline.

It worked like a charm. I put the paper up in 4'x8' pieces to keep it easy to work with and to keep it centered. I used good wallpaper glue, since it was going on the ceiling and would have to battle gravity.
 Then we put up small (1"x3") beams to hide the seams.
 Love, love, LOVE it!
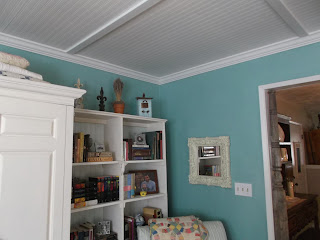 We even got the crown molding up!
 And see those weathered posts in the doorway? They spent some years in the garden and now look perfect!
 Husband is so excited, he's ready to do more ceilings! I had better jump on this while he's still in this mood!
I am going to do the same thing in the master bedroom, and I'm considering using a different wallpaper in the kitchen that will look like a tin ceiling.
I'll let you know how those projects turn out!

http://debbie-debbiedoos.com/2013/04/pinterest-pinning-party-started-and-a-change.html
Originally, I had planned to use beadboard panels, 4'x8', cut in half to make them easier to work with, and beams to hide the seams. But I would need Husband for this project and he is working quite a bit, so I wasn't sure when it would happen. Every so often, I would suggest starting this project, but...well...you know how it goes.

Not only would it be easier and cheaper, I could actually do this myself, on my own timeline.

It worked like a charm. I put the paper up in 4'x8' pieces to keep it easy to work with and to keep it centered. I used good wallpaper glue, since it was going on the ceiling and would have to battle gravity.


I am going to do the same thing in the master bedroom, and I'm considering using a different wallpaper in the kitchen that will look like a tin ceiling.
I'll let you know how those projects turn out!
http://debbie-debbiedoos.com/2013/04/pinterest-pinning-party-started-and-a-change.html


