Showing posts with label repurposed furniture. Show all posts

Wednesday, February 22, 2017

New Life for Old TV Armoires

When we finally replaced our old behemoth televisions a few years ago,
I had three large armoires sitting in the garage, taking up valuable space.
I had to either get rid of them or find a new use for them.

The first was the biggest, a pretty pine armoire from the 1990s.

I had painted it white in its next life,

but at this point, I knew it was on its way out.

I found a spot for it in my garage craft area

and filled it with fabric.

First armoire, useful.

The second one we bought at an antique store when we
were first married in the early 1980s. It had a second life
as a Nintendo cupboard for the boys in the '90s, then used
as a paint cupboard when I decided to do something with it.

I painted it a pretty shade of blue and white,
thinking I would sell it.

We added bead board to the back and some pretty things.
Now I wanted to keep it.

So now it's filled with toys.

Second armoire, useful!


The last one was my least favorite, but now it's most favorite,
because it is the most changed.
Unfortunately, I don't have before picture,
but the doors were solid and it was black when it lived in my bedroom.

I had Husband cut out the insides of the top doors
and I added chicken wire and red paint.

I put a piece of green tin over the hole in the back
that was cut out for the tv,

and added some odds and ends.

Now it lives on the back porch with my new swing.

Third armoire, also useful!


Monday, January 11, 2016

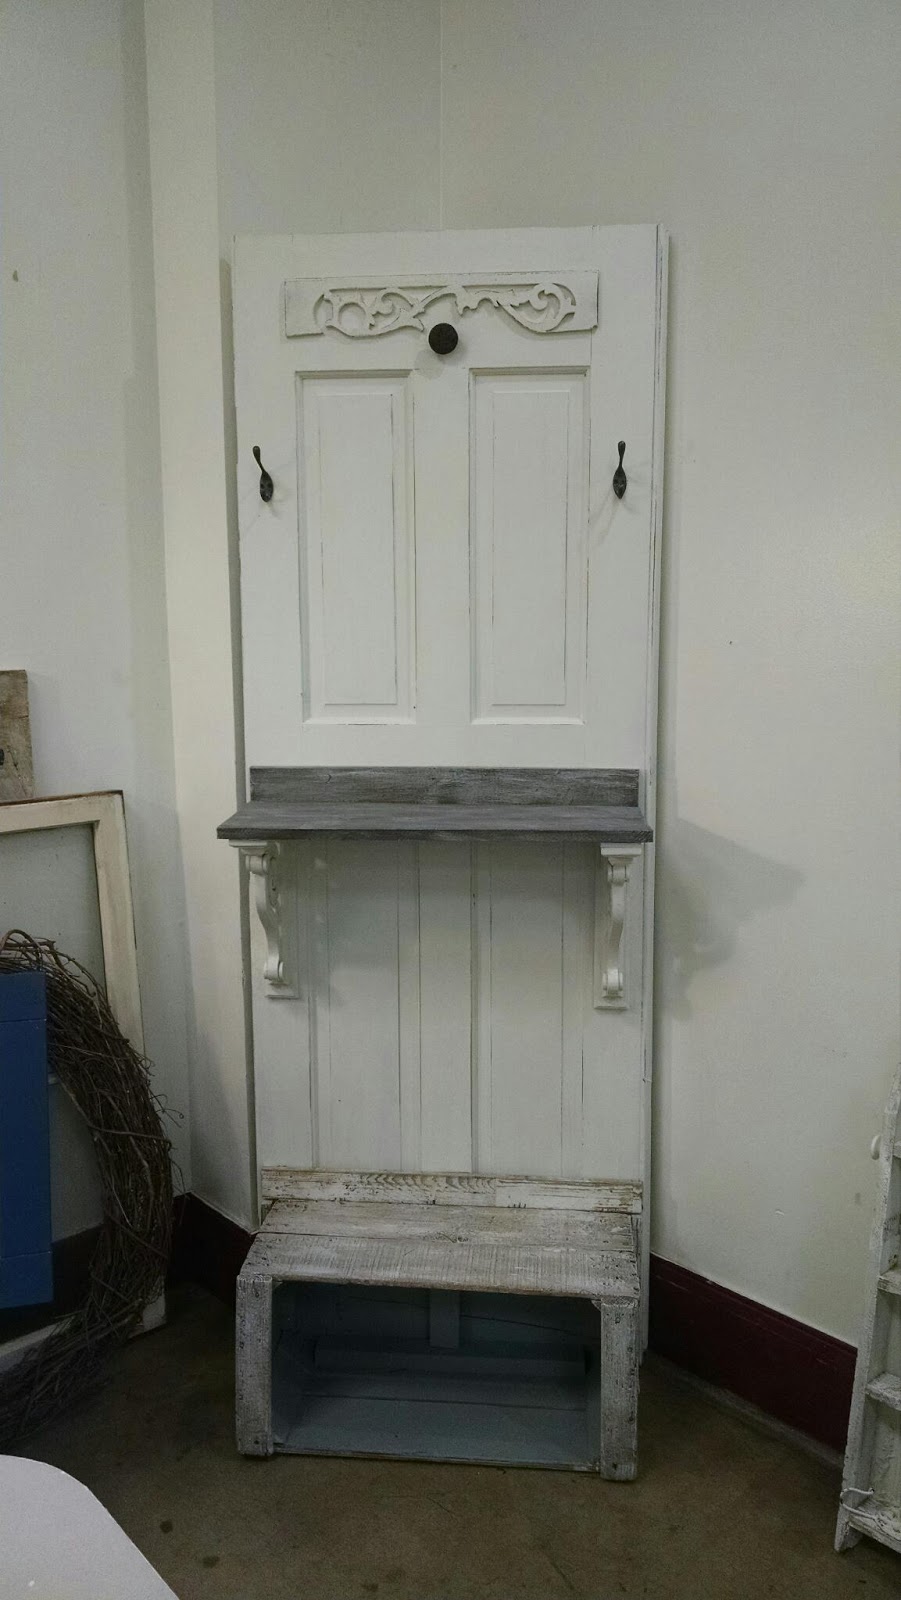
Upcycling a Door Into Something Useful

This project used up a lot of old
useless things I had lieing around:
an old door from a neighbor's remodel,
a crate missing the bottom 
and falling apart, corbals and piece of wood, hooks, drawer pull and a piece
of decorative trim.

Money I have
 invested in this piece: $0!

I put a coat of white paint on everything
then distressed.
I just dry brushed the white over the crate
because I wanted to see the old crate,
but I also wanted it to blend in to become one piece.
To tie in the shelf, I did a grey wash over the stain, then a white wash.

Here it is at Roses and Rust
 Vintage Market. The crate not only stands the door up, it provides a
 useful shelf, in this case for display!

This was a really fun project and I was
able to clean out a lot of items to boot!

Saturday, October 6, 2012

Furniture Project: Secretary Desk

I LOVE this newest piece of yardsale furniture!


This is what it looked like when I found it a few weeks ago:


Technically, it was a bar, but what I really loved about it was the fold-down front.
It would be perfect for a desk!

And the details would really stand out with paint!

I decided to paint it grey and white. Now, I don't use chalk paint because it is just too expensive. So, to get the look, I use flat paint as the base color. (over primer, of course). It has that mat look to it and reminds me of chalk paint at a fraction of the price.

But to make it really look like those furniture pieces you see all over Pinterest, I add white/cream in a satin finish to the little nooks and crannies.

Look at the difference below:

The door on the left has the white paint added to it. It gives the piece so much more depth and interest and the satin finish gives just enough gloss to contrast with the flat paint and make it look even more "chalky".

 I painted chalkboard paint on the desktop and added corkboard (painted aqua to brighten it up) to the back to make it even more functional.

The final step was wax. I use Miniwax, mostly because it's cheaper than others.  The wax protects the paint and, again, gives it more depth and interest.

Ready for Oregon Street Antique Mall.


Furniture Feature Fridays

Wednesday, August 22, 2012

Furniture Projects: Vanity Chair

The day I came across the Deco end tables, I also found this little chair. 
I might have passed it by, but it was a steal!

While I was painting the tables, I thought about what to do with this little chair. 
I decided to coordinate it with the grey tables because the lines of the chair go really well with the lines of the tables.
So, grey it was!
I used the same technique as with the tables, dry-brushing white over the grey,
 then wax on top of it all.
I went with a yellow and grey print for the cushion. I love the color combination of
yellow and grey!

Monday, August 20, 2012

Furniture Projects: Numbered Coffee Table

 Husband brought home this sad little coffee table one day

 and I thought, "maybe I can use it for parts".

 It sat in the garage for a year, then one day I literally woke up with the picture in my mind of a table I had seen on Pinterest quite a while ago.
I tried to find that picture but couldn't, so I just went with the picture in my head.

First, I put a couple coats of country white paint on the sad little table.
White paint helps everything look clean and fresh.

Then I got out some numbers I had just bought at a yard sale and randomly traced
 them on the top of the table.
I painted the numbers black and let it all dry over night. The next day I brushed a mix of stains over the top. One was a medium oak and the other was natural, I just sort of dipped and mixed on the table as I went.
The finished product:
It was so cute, I almost kept it!
But, alas, it is destined for the Oregon Street Antique Mall!

Sunday, July 8, 2012

Furniture Projects: Art Deco End Tables

A few weeks ago I showed you some pictures of yard sale finds that I was anxious to get started on, but I was in the middle of Vacation Bible School. As soon as that was over, I pulled out some of the furniture and set to work in the backyard, under the shade of my new patio roof.

The end tables were the first project I decided to tackle. They look a little Deco to me, with their gentle curves and lines and the little wood details.
I decided to go with a color scheme of grey and white.
I started with a dark grey, but I wanted to accent the details.
So I drybrushed some cream paint onto the tables,
 paying close attention to the details.
They turned out to be very sweet little tables.


 linked to:

 http://missmustardseed.com/2013/04/8926/