In all my previous houses, I wanted to do something interesting to the ceilings,
the 5th wall as some decorators call it.
Wood, beams, stencil, wallpaper...

So, in this House with Potential, I am incorporating many of the things I always wanted to do, but didn't, either because of money, time, or appeal to the masses for resale.
To start with, the ceilings in this house were popcorn. Those of you in California know what I'm talking about. So, before we even moved in, my son and I scraped all that mess off the ceilings. But that's where it stopped.
They are still mostly bare drywall.

Last week my daughter came over to help me with some projects and we decided to get started on the family room ceiling.
Originally, I had planned to use beadboard panels, 4'x8', cut in half to make them easier to work with, and beams to hide the seams. But I would need Husband for this project and he is working quite a bit, so I wasn't sure when it would happen. Every so often, I would suggest starting this project, but...well...you know how it goes.
 So last year, when I discovered beadboard wallpaper at Lowes and used it on my interior doors, I started rethinking my ceilings.
Not only would it be easier and cheaper, I could actually do this myself, on my own timeline.

It worked like a charm. I put the paper up in 4'x8' pieces to keep it easy to work with and to keep it centered. I used good wallpaper glue, since it was going on the ceiling and would have to battle gravity.
 Then we put up small (1"x3") beams to hide the seams.
 Love, love, LOVE it!
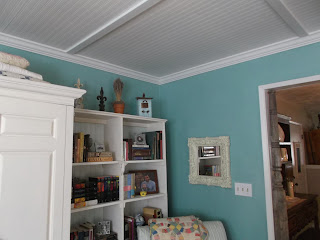 We even got the crown molding up!
 And see those weathered posts in the doorway? They spent some years in the garden and now look perfect!
 Husband is so excited, he's ready to do more ceilings! I had better jump on this while he's still in this mood!
I am going to do the same thing in the master bedroom, and I'm considering using a different wallpaper in the kitchen that will look like a tin ceiling.
I'll let you know how those projects turn out!

http://debbie-debbiedoos.com/2013/04/pinterest-pinning-party-started-and-a-change.html
Originally, I had planned to use beadboard panels, 4'x8', cut in half to make them easier to work with, and beams to hide the seams. But I would need Husband for this project and he is working quite a bit, so I wasn't sure when it would happen. Every so often, I would suggest starting this project, but...well...you know how it goes.

Not only would it be easier and cheaper, I could actually do this myself, on my own timeline.

It worked like a charm. I put the paper up in 4'x8' pieces to keep it easy to work with and to keep it centered. I used good wallpaper glue, since it was going on the ceiling and would have to battle gravity.


I am going to do the same thing in the master bedroom, and I'm considering using a different wallpaper in the kitchen that will look like a tin ceiling.
I'll let you know how those projects turn out!
http://debbie-debbiedoos.com/2013/04/pinterest-pinning-party-started-and-a-change.html


This is genius! I adore this look. I just bought some beadboard wallpaper to use in our rental after the current renters move out. I can't wait to try it there. Looks so real!
ReplyDeleteI've thought about using the beadboard wallpaper, too. Is the paper flat or does it resemble the raised surface of beadboard?
ReplyDeleteit does have the grooves just like beadboard, that's why it looks pretty real. Lowes is the only place i have found it, about $20 a roll.
Deletethere is a place online that sells it in double rolls for the price of a single roll at Lowes. I wish I could remember the website but I know it is on pinterest!
Deletegood to know! i will start looking for it, but let me know if you find it first! i have other projects in mind! thanks!
DeleteYour ceiling looks terrific! I used this paper on my kitchen cabinets and love it. I too want a bead board ceiling. Hmmmm...I might just do this!
ReplyDeleteI'd love it if you would share this at "What We Accomplished Wednesday," at Green Willow Pond. It is live right now. Have a great week!
Hugs,
Deborah
Great job! It really adds dimension and architecture to the room. You and your daughter should be very proud!
ReplyDeleteXO,
Christine
Really clever! Might have missed it in the post, but how many rolls of wallpaper did it take to do the room and what is the general cost of fancy-pants paper like that?
ReplyDeleteCraft On & dance like no one else is watching :)
Visiting from Your Whims Wednesday@My Girlish Whims' linky party
Smiles,
Suz @MaytagNMom
NW Illinois
My Party Project This Week
The room is about 12 x 16 and I think it took about 2 1/2 rolls. The cost is $20 a roll. The wood strips were about $30 and the crown was about $50. So, I think for the cost of $130, it was well worth it!
Deleteoops, proper link back to the party I spotted you at. Saw you at The Shabby Creek Cottage's linky party (Transformation Thur)
ReplyDelete~Suz
That is so cute. Reminds me of the ceiling at a summer cabin we rented a few years ago.
ReplyDeleteOh that is a wonderful idea, it's not like it has to stand up to wear as it would on the wall. Visiting from the Shabby Creek Cottage linky party, I'd love for you to drop by and check out my latest post.
ReplyDeleteBecky @ Posh Pink Giraffe
Great idea for your ceiling. I love using beadboard wallpaper. There are so many ways this stuff can be used. Very clever idea to use on the ceilings for a cottage look too.
ReplyDeleteJennife @ Decorated Chaos
http://decoratedchaos.blogspot.com
This comment has been removed by the author.
ReplyDeleteGreat idea! I love how it turned out! We actually used some of the same wallpaper on our kitchn cupboards.
ReplyDeleteThe ceiling looks wonderful! What a great idea. Great price for everything. Now I want to try it!
ReplyDeleteWhat a great idea Casey, looking forward to the next ceiling you reinvent.
ReplyDeleteJoy
Absolutely fantastic!! I think I might give this a go in my little closet nook. Thanks for the inspiration!
ReplyDeleteKatie
Wow, that is very cool! It adds so much character!
ReplyDeleteCasey, What a great idea and the ceiling looks fabulous. Check out this weeks Open House party to see it featured.
ReplyDeletexx,
Sherry
thanks, sherry!
DeleteI love this, Casey! It must have been a little difficult working at that height and angle but it was well worth it! I'd love to do this in my kitchen, I need to work on hubby! :)
ReplyDeleteXO,
Jane
I actually did about 1/4 of the ceiling by myself, I just cut the paper in half (those lines of the "beadboard" came in handy) so I could handle it. It was also one of the reasons I didn't try to run an entire length of the paper on the ceiling and chose to use "beams", it made it a lot easier to work with.
DeleteWOW! I love your ceiling! If you have a chance, please link this to my linky party: http://suburbsmama.blogspot.com/2013/04/sunday-linky-party-2.html
ReplyDeleteThis is just brilliant! What a great way to cover popcorn ceilings (I'm not from CA, but I know just what you're talking about!)
ReplyDeleteI featured this post on this week's Grace at Home!
I agree with Richella. This is brilliant! Who would think that beadboard wallpaper would look so great. We have a little cottage with those old acoustic squares on the ceiling. I think this would work for that! Thanks for sharing and blessings, Patti
ReplyDeleteThank you so much for this post! I have had drywall ceilings for EVER now & using wallpaper on it would be SO much cheaper than any other options. I am totally heading to Lowe's to look for something. It's in my kitchen, so the "tin" option may work too. Thanks again.
ReplyDeleteI would love to see your finished ceiling!
DeleteIt looks great and I love the addition of the beams! I just love this wallpaper too. I have a little vintage travel trailer that I used the bead board wallpaper on the interior doors and the faux tin ceiling wallpaper on the ceiling! My vintage trailer posts are here: http://littlevintagecottage.blogspot.com/search/label/My%20Vintage%20Trailer if you are interested. Several of the posts will show the ceiling.
ReplyDeleteTania
love your trailer! i can't wait to get to work on my kitchen ceiling, yours looks great! i didn't see the doors, just wondering if they look like mine. thanks for sharing!
DeleteAssuming you will need another panel of wallpaper to fill up all of the mdf board, hold another piece of beadboard wallpaper up next to where the first panel left off. If there is too much mark where it needs to be cut and then adhere the beadboard panel onto the mdf the same way as in the step above.
ReplyDeletebeadboard
Hi Casey,
ReplyDeleteI loved this idea so much that I have taken on the task of doing an entire condo in Beech Mountain, NC. It is located at the bottom of the ski slopes so I'm going for a "lodgy" kind of feel and I think this will be perfect! So far I have scaped the popcorn texture off the ceiling and have the wallpaper up. My question is how did you attach the beams? They are not all falling on studs and I don't want to worry that they may come loose or even fall in the future. Thank you for all your great ideas and I look forward to hearing from you!
Good question! I did not plan my beams to line up with the studs, rather to be symmetrical, so we ran into the same thing. We nailed them to the cross studs.
ReplyDeleteGood luck with your project! I would love to see pictures!
This comment has been removed by the author.
ReplyDeleteIt's been a while, but I'm pretty sure it was. I bought it at Lowe's, but I have seen it online at home depot and Amazon and I think some were different sizes. Good luck!
ReplyDeleteHello! Did you use wallpaper that is 20.5" wide? That's all I'm seeing on the Lowe's website. Thanks!
ReplyDeleteWould this work on top of the popcorn ceiling? Many popcorn ceilings have asbestos and want to avoid having to remove it.
ReplyDeleteJust love this look and the ease and cost of the project. We are considering this look for our kitchen remodel. Question is....is the wallpaper only one color and/can it be painted to your knowledge? We are going to check out the wallpaper next time we get to Lowe's or find it on line
ReplyDeleteDo you think this would work in a bathroom?
ReplyDeleteHi. Great idea. I scraped my ceilings some time ago, but not confident enough to skim-coat myself. Just wondering... did you prime the ceiling prior to installing the wallpaper? Thank you!
ReplyDeleteFantastic Popcorn roof removal service! The quality of the finish exceeded our expectations, and we would gladly recommend them.
ReplyDelete